Tuesday, May 5, 2015

Been pretty busy, but here's a small update

As my wife is finishing up her maternity leave I've been finding myself fairly predisposed of as of late.  Since my kids and work have to take priority my Gunpla hobby has been put on the back burner.  My wife and I also have some new parent friends so time is a precious commodity to me anymore.

That being said, I haven't stopped with Gunpla.  It's just slow going at the moment.  My current project is a HGUC Gouf Custom that I'm trying a few 'new' things on.  I'll probably post a work in progress for it in the next week or so.  I had always thought of myself as a Master Grade guy but I find myself messing with HG's more and more recently and there's a few reasons behind that.  One; They're cheaper, no surprise here. Two; Since I don't have that much time to dedicate to Gunpla currently, it's a lot easier and faster for me to pick up a HG and get to detailing it than to tear apart a MG.  Three; Modern HG's are better than they've ever been.  I remember getting my first Gundam Wing and G Gundam HG's from Wal-Mart back in the day and looking back now, they were atrocious.  The HG's coming out now have better technology and engineering than most early MG's and proportion wise they look great.

Basically my Master Grade work is going to be limited to my backlog for a while.  I just can't afford to drop $50-$70 on a MG.  Especially when I can get a great looking HG for around $20.

Well with that, here's some pics of my work desk and most of my backlog.


As you can see, my desk is currently a wreck.  I basically have this mobile Gunpla work station set up and have been doing the bulk of my work at the kitchen table (easier to watch my daughter that way).  So my desk has sort of become a spare part/junk collector.  If you can make out the MG Char's Zaku and the HGUC Gelgoog in there, those will probably be my next galleries.


Generally how I do kits is snap fit them.  Let them sit like that for a bit.  Then decide what I want to do to them as far as painting and detailing goes.  This also means the bulk of my current collection is unpainted plastic on a shelf.


I'm not a huge Gundam SEED fan (not a straight SEED hater like a lot people either) but I like some of the basic designs like the Strike and the Astrays.  The Astray Blue Frame on this shelf was built by my wife some time ago, and she got me the Red Frame as a little gift not too long ago.  Both are great Master Grades and I'm very anxious to tear into the Red Frame and make it look nice.

Some might be wondering about the Zeta-esque Wave Rider thing on the left.  When we moved into our house a few years ago a couple of my kits took some damage in the move.  2 of which were my MG Zeta Gundam 2.0 and Delta Plus.  Instead of trying to fix the tiny transformation joints I decided to kitbash them.  It's just something I fiddle with now and again.  Not even sure of a final shape or color scheme for it.


In the world of Gundam and Gunpla I can say without a doubt that my favorite mechanical designer is Hajime Katoki.  Whether it's his originals or his redesigns I tend to like everything he does.  In my opinion, Gundam Unicorn is one of his crowning achievements as far as designs go (if you didn't know, Hajime Katoki was the chief mechanical designer for the Unicorn series).  Anyway, it shouldn't be a surprise that my favorite Master Grades are Ver. Ka's.  The Sazabi Ver. Ka in particular.  A suit piloting by my favorite character (Char Aznable) redesigned by Katoki for a monstrous MG release?  That thing was one of the few kits that took over my thoughts until I had it in my hands and in my opinion it didn't disappoint in any way.  I may change up my shelves every now and again but my Katoki shelf here has remained pretty much unchanged since I set it up.


Currently the biggest, most expensive kit in my collection. The Perfect Grade Unicorn Gundam.  This was a Christmas present from my mom.  It's my first PG and honestly it was a bit overwhelming to build the thing.  People basically bitch about how its just a big MG Unicorn.  But on an engineering level I think it is quite a lot better than the MG.  I plan on doing a pre-shade paint job on this guy but for right now it is kind of just sitting.  I want to able to dedicate my full attention and resources on this kit to make it look the best that I can and I just don't have the time right now.  It's depressing, but until my family life calms down a bit this monster of a kit is on a back burner.


I touched on the HG Lightning Gundam Full Burnern's balance issues when I did its gallery.  Alas, it's fallen down again.  This might be a kit that ends up being fix pose because I'm tired of constantly standing the thing back up.  The GM Command there will eventually be detailed and weathered.  The Star Build Strike on the left is complete and just awaiting a gallery.


Jeez the Hyaku Shiki is shiny.  The Kampfer on the right is a semi-custom that's near a completion/gallery point.  The GM Sniper II on the left is the GM Sniper K9 without it's extra accessories.  Eventually I'll get a standard blue GM Sniper II and put the K9 accessories (most of them anyway) on it.  I think the base kit looks great in green anyway.


Ah, my MG Wing Gundam EW.  This was my first airbrushed/pre-shaded Master Grade.  Unfortunately, like my Zeta and Delta Plus, it took some damage while being moved.  I just did the best I could to fix the busted waist, hip, and knee joints.  Since it was painted, I put this guy in it's own box and that box happened to take a heavy tumble.  I used Createx paints on it.  Which, seemed great and easy to use while I was painting.  But, I realized after a few days how brittle the dried paint is (much more so than Tamiya acrylics or Model Master enamels).  Because of the fragile joints and paint job this guy is unfortunately pretty much fix pose.

Well, that's all for now.  I feel bad for not posting any 'actual' content but this will have to do for now.  I should have an actual gallery or my Gouf Custom WIP up within the next week or so.

Til next time.

Monday, April 13, 2015

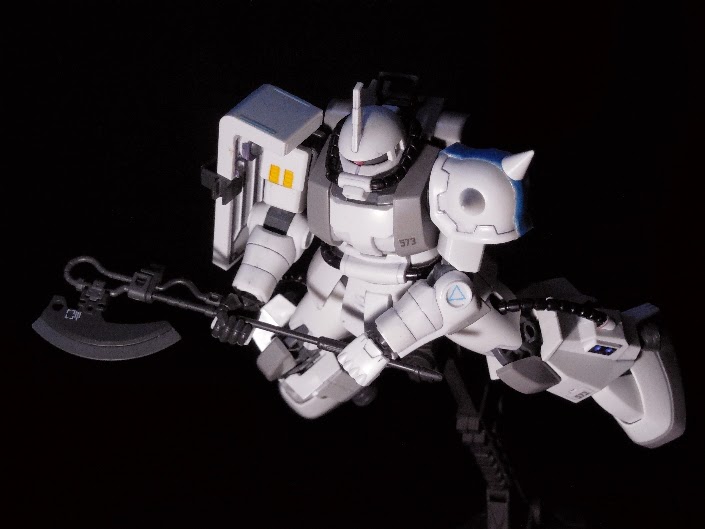
HGUC MS-06R-1A Shin Matsunaga's Zaku II


If you collect HG's or even Gunpla in general there's no reason not to own one of the Zaku High Mobility Type variants.  Be it this Shin Matsunaga variant, the Black Tri-Stars, Johnny Ridden, or even the Zaku Amazing.  It's a solid kit and a solid, quick, fun build.  The model feels sturdy in your hands and suffers from hardly any weight or balance issues.

The Good:
-Solid construction.  No loose joints to be found here.
-Proportions.  Compared to the older HG and MG Zakus the proportions and looks on this kit have a modern 2.0 feel to them.  Especially the head with its thinner 'visor' opening.
-Articulation.  Aside from the more expensive RG and MG 2.0 Zakus, you won't find a Zaku with better overall articulation.

The Bad:
-The Zaku Machine Gun has to sit in the hand at a pretty awkward angle due to the stock.  It's not terrible, but from some angles it can be a bit ugly.
-The Stripe sticker on the left shoulder loves to peel up.  However, there's really nothing Bandai could have done about this.  Aside from giving water slides to a standard HGUC release...right...

WIP Notes:
-I took the bazooka mounting peg off the weapon mount piece on the shield.  I always felt Shin was more of a melee pilot and would prefer the machine gun.  I think it being flat makes it look cleaner when the weapons aren't mounted.
-The weapons mount is cemented to the shield for one reason.  To not tear up the '573' sticker right below it by taking it on and off.
-The extra blue stripes on the shield came from an extra stripe on the sticker sheet.  
-I used the stickers for the gray pieces on the lower legs.  I had a hard time matching the silvery-gray that they're supposed to be.
-Used acrylic gems for the mono-eye and the machine gun scope.  
-There are circular white pieces missing from the knee joints.  I honestly don't know where they went.  (My daughter probably had something to do with it.)
-The Anti-Ship Heat Hawk (I think that's what it's called) came from Bandai Weapon System 002.
-Gundam Markers were used for the painting and panel lining.


Comparison next to standard Heat Hawk


Comparison with standard size (18m) GM Command


Final Thoughts:

I really have nothing but good things to say about this kit.  Yeah, that stripe sticker is a bit wonky but what can ya do.  I know the 'canon' color for inner thrusters is red but this kit already had a white and blue theme going on so I just went with the blue for the vents and bells.  The huge axe is a bit heavy for the wrist but, the axe isn't an original accessory for this kit and the weight issue isn't that bad.

The stickers that are here are done very well.  They're used for color apps in only one place (curvy gray piece on lower leg) not counting sensor stickers.  The rest are kind of like marking decals and help set this kit apart from other HGUC's.  This very white Zaku especially benefits from them as the blue stripe, White Wolf, and 573 stickers help break up all that white.

Of the current 4 modern HGUC Zaku variants this one can probably take the most from some detailing time.  It's white, very white.  In fact straight out of the box this thing does look rather plain because of it.  However, because of its white-ness it will stand out next to other grunty green Zeon suits on your shelf.

Overall I can completely recommend Shin Matsunaga's custom Zaku II to anyone.  It's a great starter kit and Gunpla veterans will appreciate the efficient engineering of the build and the modern proportions.  You may prefer the black/violet/white scheme of the Black Tri-Stars Zaku or the orangey-red scheme of Johnny Ridden's Zaku but they're all essentially the same kit.  The Zaku Amazing also uses this same 'frame' and holds up very well next to the generally more posable Build Fighters and All-Gundam Project HG's that it's usually partnered with.  The price point is pretty reasonable for what your getting and any or all of these Zaku's would be a nice addition to any Gunpla collection.

Until next time...


Gallery for HGUC Shin Matsunaga Zaku II Coming Soon

I'll have the gallery for this kit posted late tonight or early tomorrow morning.  I tried a new lighting setup and tried to be a little more inspired with the poses.  Hopefully this leads to a better gallery than the Lightning.

Friday, April 10, 2015

HGBF Lightning Gundam Full Burnern


I'll start this small gallery off by saying I have an extreme love-hate relationship with this kit.  On one hand; I like the aesthetics and overall look that this ReGZ/Zeta Gundam variant offers, on the other hand; it's a floppy mess and even after doing some severe joint tightening surgery this thing was still a pain to pose.  I'm honestly a little disappointed that this kit was the one I chose to start this blog up again with.  But, I'm just going through the kits I've done in the past couple months in chronological order of when I got them.  By the end of taking photos this HG was ready to fall apart so I didn't even bother with posing it with its beam sabers.  Melee isn't really what this thing is known for anyway.

The Good:
-Nice looks and decent shelf presence because of its size.
-Not many color apps missing out of the box and the stickers they do give you are decent.

The Bad:
-LOOSE joints.  Particularly the waist joint.  It barely holds up the huge backpack.  Furthermore, when transformed the kit just wants to fall in half because of this joint.

WIP Notes:
-Used Gundam Markers for every paint app on this guy, ie. the yellow throughout the kit, gray in various places, gun-metal (not sure of the actual Gundam Marker name of this color) for the rail gun and cannons.
-I did keep the original eye stickers, sensor stickers (minus the main camera on the gun, there wasn't one), and the light blue-gray around the feet.


Size comparison next to a standard size HGUC Zaku II

Final Thoughts:

Well, like I said at the beginning, this kit looks nice but is a pain to do pretty much anything with.  The base Lightning Gundam itself is OK for holding together.  It still feels kinda loose in your hands.  Then you add the Lightning Back Weapon System Mk. II to the back to make the Full Burnern and you run into heaps and heaps of weight issues.  On a side note I feel like the proportions of the LBWS Mk. II are a bit on the large side compared to the anime.  Also, its quite heavy.  About as heavy as some smaller HG's actually.  Throw this on a tall kit with a weak waist joint and its not surprising it has problems holding together.  The large rail gun attachment for the beam rifle is pretty heavy as well.  Truth is I have problems getting this thing to even stand.  Putting it on a display base fixes all of the top heavy balance issues, but two major issues remain.  The weak waist joint, which means the dynamic waist poses modern HG's are known for is not happening.  The wrist joint.  That rail gun is pretty cool, but the wrist has some serious issues holding it most of the time.

All that aside.  Joint tightening with super glue and tape solved most of the issues on my kit.  It is still very top heavy and the balance on the ground is garbage.  The kit looks great if you can get it in a good pose, if.  If you like the design or the anime then I can recommend it to you.  The aesthetics keep the Lightning Gundam Full Burnern from being just a big, floppy kit.  Its one of the few Gundam Build Fighters designs that feel could be canon for its respected base series.  Universal Century in this case.  Keep in mind that either 'version' of the Lightning Gundam requires a separate kit purchase for the backpack.  As for regular collectors I cannot recommend this kit(s).  You'll just be disappointed at having another unbalanced floppy kit on your shelf.  

If you like the Lightning itself or the pilot/builder Yuuma Kousaka, or even Gundam Build Fighters Try then you may want to pick up the HGBF Lightning Gundam and the HG Lightning Back Weapon System Mk. II to make the Lightning Gundam Full Burnern.  Otherwise feel free to pass on this kit, or at least this version of it.


How I'm gonna do galleries from now on

I decided that from here on I'm going to use the same format for all my Completed Kits galleries.  I'll start with an overview and touch on good and bad points.  I'll also add in what I used for paint.

I'll do my best to not start each gallery with a wall of text.  Look for my Lightning Gundam gallery to be up soon.

Wednesday, April 8, 2015

Returning to Gunpla

It's been a long time since I've posted anything or even viewed this blog.  But sometimes that's how life is.  Certain things take priority, like kids and job searching.

I'm writing this post to say that I'm going to try my best to start maintaining this blog again.  I live in the US in the Mid-West so fellow gunpla fans are few and far between.  I may not be in the same ranks as blogs like Gaijin Gunpla or GoodGuyDan, but this blog made me feel more connected to the gunpla community when I was updating it regularly.

So on that note be on the look out for regular updates. I have a few kits I've finished in my absence and I will add galleries for them as soon as I can. 

Until next time...

Saturday, September 6, 2014

TT Hongli MG Sinanju

Just finished building this guy today.  It was a weird building experience to say the least.  One thing this has over the bandai version is the stability of the rifle. It pegs into the hand a lot more securely.  Secure enough that the only weight issues I get with the combined beam rifle rocket bazooka come from the elbow.  Well thats all for now.  I'll probably do a proper update video soon.