Wednesday, July 1, 2015

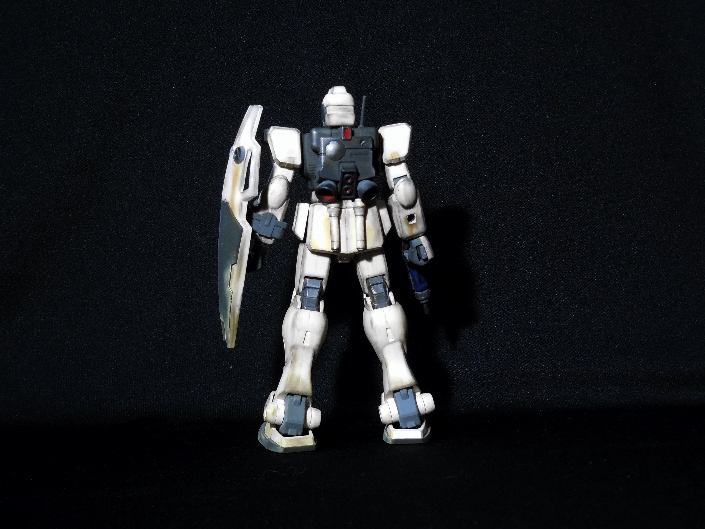
HGUC RGM-79G GM Command


RGM-79G GM Command
Mass Production Commander-use General-Purpose Mobile Suit

Specs:
Head Height: 18.0 meters
Max Weight: 56.4 metric tons
Standard Weight: 43.5 metric tons
Power-Plant: Minovsky Ultracompact Fusion Reactor
Power Output: 1330 kW
Sensor Range: 6000 meters
Pilot Accommodations: Pilot only (in standard cockpit in torso)
Armor: Titanium/Ceramic Composite

Movement:
Max Acceleration: 1.19 G
Max Speed: 125 km/h
180° Turning Time: 2.4 s
Rocket Thrusters: 2 x 26500 kg, 2 x 7000 kg
Vernier Thrusters: 10

Armament:
NFHI RGM-M-Sh-AGD Shield
HWF GMG·MG79 90mm Bullpup Machine Gun
BLASH HB-L-03/N-STD 380mm 'Hyper' Bazooka
Beam Saber x2


Saturday, June 27, 2015

HGUC RGM-79G GM Command WIP Part 2

In this part I'll go over the other hand painting I did, as well as the beginning of the weathering.


Current mess of my work mat.  All of the detail/hand painting is done at this point.


Added black, then red, and finally grey to the small thrusters on the backpack.


Grey for the teeny head vulcans.


Added some grey to the shield for the minus molds.  Also added a touch of grey to the recessed part on the dark part.


After the dark grey on the underside of the shield dried, I added some normal grey to the upper panel and the spare ammo packs.  Added steel to the circles shapes behind the minus molds.


The bazooka was pretty simple.  The barrel is gun metal and the rest is dark grey.  Went in with some steel for details.  Also added some red for the 'rounds' that are visible out the back.


By far the most tedious painting task on this kit were the small verniers on the legs and front skirts.  Just simple base coat of black and touch up with red.


Added grey and dark blue to the machine gun.  This is how this gun is colored in Gundam Crossfire, with the blue on the front stock.  I just decided to replicate that here.


A usual thing I do is paint the insides of thrusters.  Just like most late 0079-0080 mobile suits the canon-color is red.


I went through some debate but finally decided to paint the inside of the visor with fluorescent green.  When test fitting with the head it has this nifty effect of there being a line of light inside of the visor. 


Onto the weathering.  Again, using Tamiya Weathering Master.  This time I treated myself to the "A" set which contains Sand, Light Sand, and Mud.  Should be able to do some proper dirt effects with this.  Using Rust as dirt coloring on my Gouf Custom turned out ok but I'm sure the actual dirt colors will work better.


Basically just went around and added base layers of Soot and Mud to the edges.  I really only used the Mud on the lower legs.


Since I now have the actual dirt set I decided to use the Rust color for some rust effects.  I tried to keep it subtle.  I've got this spot on the front skirt and...


...this spot on the back skirt.  I was really happy with how this came out except... when the beam saber hilts are on, the effect is totally covered.  Ooo well.


The last bit of rusty effect I added was to the shield.  I have to say, I'm really happy with how it turned out.  Basically just layered up some Rust under the minus molds and kind of dragged it down the shield.

Well unfortunately this is all I have for the WIP's.  I had a set of pictures for doing the dirt effects but they were lost while my laptop was under repair.  Basically just used the Sand and Mud around the bottoms of the feet/legs and a bit on the bottom of the shield.  I also went in and added more Soot around where the thrusters and verniers would be blowing flame out.  Just gotta always think when weathering: where would the dirt and grime actually be?

So that's all for now.  I've already started shooting the final gallery and it should be up tomorrow morning.

Til next time...

Wednesday, June 17, 2015

HGUC RGM-79G GM Command WIP Part 1

Basically at this stage all I'm doing is filling seam lines and laying down some base coats for detail painting.


The first glaring thing that needed handled on this kit were seam lines.  Particularly the forearms and the lower legs.  As you can see, it's just a simple 2 halves assembly with some polycaps.  


The next minor thing I decided to take care of were the shoulder joints.  After about a week on my shelf the shoulder started lowering under the weight of the shield (which isn't all that heavy, most old polycap joints just tend to be loose).  We're just gonna dab some super glue on the polycap pegs to thicken them a tad and strengthen the connection (FYI this trick will work on most loose peg-hole and ball joint connections).


The 'tools' I'll be using for this are Mr. Cement for the seam lines and some Loctite Super Glue.  Regular super glue works just fine.  This is just the stuff I use around the house.  It has the bonus of having a fine tip and some... pressure control I guess is what you'd call it.


Starting with the seam lines.  I just kinda liberally apply the cement all around the edge where the seam is.  Then ya just firmly close the pieces and let the cement cure.


Lots of people have different methods for the super glue trick.  I think most people glue the peg, insert it, and kinda turn or work it around so the glue stays and dries put doesn't glue the connection.  I prefer to just dab some on and sand it down until it fits well.  Quick note: I've tried a few different super glues with gunpla and in my experience Loctite (any kind of Loctite really) cures harder and sands easier than the other ones I've tried.


Next up is the shield.  There's an embossed Federation symbol in between the minus molds.  Personally, I've never really liked embossed symbols like this on gunpla.  I think they look tacky and toyish.  So...


Off it comes.  Some quick work with the file and voila.  Smooth shield.  I'll probably add a EFF symbol decal in its place later on.


I'm still having issues deciding what to do about the overly clear visor.  Basically it just shows how hollow and non robot the head actually is.  I'm thinking I'm gonna hit the inside of it with some chrome or gloss black paint.


Using my old friend Tamiya Dark Grey to hit all the undersides of armor and the shield.  The first coat always looks terrible on this big an area.  Looks like all of this will be good to go after a second coat though.


I then layed down some base layers of black on the minus molds of the shield, the small thrusters on the legs, and the small ones on the backpack.  Also added some black to the vents on the cheeks.


Finally, threw some black in the vents on the chest.  Thought about putting black in the lower vents but decided the one panel line would show up better in grey.

Well that's all for now.  I've actually done quite a bit of painting since I took these pics.  I just find it hard to take pictures while messing with paints and cleaning brushes.  So the next WIP will mostly be going over the paint apps and detailing I decided to do.  Then the 3rd WIP will most likely be the final one and consist of weathering and final touches.

Til next time..