Tuesday, May 26, 2015

HGUC Gouf Custom WIP #2

Well here's the second and final work in progress for the Gouf Custom.  As I type this the model is sitting on my desk complete.  So on that note I should have the gallery up in the next couple days.  But for now, on with the WIP.  Pretty much just weathering and top coat left to do.


At this point all of the sanding and detail painting are done.  I had just finished up all of the panel lining as well.  I mostly used the dark grey Gundam Real Touch Marker for the lining.


Quick shot of the arm before weathering.


So somehow I managed to lose 2 things on this kit.  The first and not pictured thing is the left closed fist hand.  I have the hand cover but the fist is gone.  Second being the 'closed' piece for the Heat Wire.  There's supposed to be a small round gray piece that pops into that bottom peg hole.  It's tiny and probably fell on the carpet never to be seen again.  This is what I get for building a kit and letting it sit for a few months before I work on it. -_-


Some other painting I did that I forgot to take pictures of.  Added some Model Masters Gun Metal to the barrels of the Gatling Gun and the Zaku Machine Gun.  I like this gun metal more than others because it actually has a nice bluish hint to it, looking a bit more like real gun metal.  From what I've seen most gun metal paints are some variant of a kinda generic metallic grey.  I think every Gunplar and their grandmother has used the metallic grey gun metal on a kit at some point (me included).

Sorry for the tangent.  Anyway, I didn't bother using it on the 3-Barrel Machine Gun because the visible 'barrels' on that gun are actually covers or guards of some sort.  If you look down inside you can actually see the small indent that's supposed to be the real barrel.

I had to recheck the anime but the sword hilt is supposed to be blue.  The same dark blue as the Gouf itself from what I could tell.  Well I threw some Tamiya Blue (which is actually pretty dark) on it and it matches enough in my eyes.  Also threw some black in the groove running down the blade.


On to the weathering.  I'll be using the Tamiya Weathering Master B and C sets on this kit.  I've used these once on a Master Grade Zaku and liked how it came out for the most part.  I do feel and hope they'll look better on the smaller High Grade scale.

Left, weathered.  Right, Unweathered.

So I'll mainly be using the Soot (Black) and Rust (Brown) colors from the B set.  Pretty much just hitting all the edges with the Soot to basically emulate Post-Shading.  It works pretty well but you do have to be careful.  It's very easy to apply too much and have black all over your piece.  I found myself using slight damp q-tips to clean it up and sorta sharpen the edges.  I decided to put some Rust (which really is just brown) around the feet simply because the Gouf is a ground pounder and it would only make sense that it'd have dirty shoes.

Left, unweathered.  Right, weathered.  Sorry for the flip flop.
On the bottoms of the feet I just lathered that brown around.  I actually ended up putting on more during my last minute check before top coat.

Unweathered

Weathered
Some better before-after shots of the feet.


Lower leg comparisons
Just followed the same pattern of hitting the edges with the black.  Added some brown to the bottom of the bells.  These almost hit the ground anyway.  Also hit the knees with the brown but its pretty subtle.  Just trying to think: What would actually have dirt on it if this thing was real?  I didn't add brown anywhere else as I didn't think the top half of him would have actual dirt on it.

All parts weathered, ready for top coat.
One thing to note about the Tamiya weathering sets is that they are messy.  Not cover your work area messy, but your fingers will be coated in the stuff.  I did mean to take more individual pictures but I really didn't want to get the stuff on my camera or wash my hands constantly.  

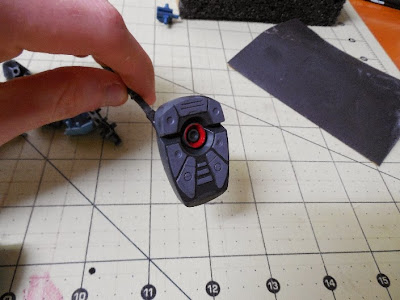
I did use the Silver from the C set on the weapons.  I also put touches of it on the shield and the black part on the chest.  I found it odd but I had some issues getting the silver to... well its hard to describe.  Its like I would lay down a bit of glitter but no actual silver.  Ended up just layering it on kinda heavy and some silver did start to show up thankfully.

After flat top coat.
Sorry, not sure why these pics came out so yellow.  Anyway, I used my go-to flat coat on this kit.  Two quick notes about Tamiya Weathering Master sets and flat coating that I noticed on this.  1: The blacks and browns sorta fade down and get a bit more subdued.  2: The silver got well... more noticeable.  If you look at the sword you'll notice quite a bit of silver on the blade.  Before flat coating it wasn't nearly that noticeable.  


My go-to flat coat is Alcad II Lacquer Flat Kote.  I decided to throw my airbrush in the pic since I had just finished cleaning it.  It's a Badger 105 Patriot.

Well that does it for this WIP.  I do want to mention that I actually had some fun messing with the weathering sets.  So much so that I can't wait to use them on another HG.  I have noticed that there isn't too much about these sets on the net.  Especially relating to Gunpla.  I think after I have some more experience with them I'll post a tutorial on them.

Look forward to the Gouf Custom's Gallery to up in the next couple days.

Til next time...

Thursday, May 21, 2015

Small Quick Update for Gouf Custom

I haven't been able to accomplish much but I have been working on this guy.

Well this is where I'm at currently.  I've been sanding down other parts of the kit here and there as well.  That's just something that's easy for me to pick up and put down if need be.


Probably one of the easiest things anybody can do to a HG is paint the undersides of certain armor pieces and shields.  Two coats of dark grey later and the skirts and shield are near done (I may hit them with 1 more light touch up coat).  


Both of the legs are now done besides weathering.  Not sure if I clarified, but I am going to be doing all the weathering to the kit as basically the final step before top coat.  I am happy with how the legs turned out.  I know it isn't much but I think just adding the tiny bits of grey did add something to the aesthetic.


I almost forgot.  I also hit the Zaku Machine Gun with a coat of dark grey.  It needs 1 or 2 more coats and then it'll be ready for detailing.  Definitely better than the purple-y grey it came molded in in my opinion.

Well that's all for now.  I'm trying to expedite my work a little bit on this guy.  I hate spending too long on a kit when I know I could finish it easily if I had some more free time.  I actually built this kit in November of last year so it feels like I've been working on it that much longer.  Even though I only started painting it and whatnot not too long ago.  I'm off all day tomorrow so hopefully I can get some more accomplished.

Til next time...

Wednesday, May 13, 2015

HGUC Gouf Custom WIP #1


Well here's my first WIP for my Gouf Custom.  I'm not gonna go into the specific techniques of everything I'm doing.  Eventually I plan to make 'tutorials' on that stuff.  Anyway, I'm just kinda casually working at this guy.  I started on the legs and by sanding them to 600 grit.  There's a few reasons behind the sanding.  1, Paint and primer stick better, 2, The weathering effects I'm going to add will stick better, 3, I'm planning to flat coat this at the end and the sanded finish will give me a head start on the matte effect.


First coat of paint on the feet.  I don't know why but I love painting the feet on HG's.  It's just really easy to throw some grey on there and bring lots of detail out.


Real quick.  The paints I'm using on this guy are Tamiya Acrylic XF-24 Dark Gray (one of my favorite paints), X-7 Red, X-19 Smoke (I'll talk about this stuff in a bit), XF-53 Neutral Grey, X-4 Blue (not pictured, and Model Masters Gloss Black enamel.


Some shots of what I have so far.  I thought adding the grey to the little trapezoid-y details would... well add more detail.  Looks like some of my foot paint scraped off... grr.


This is what I'm using the Tamiya Smoke for.  I'm basically just dry-brushing this stuff onto the frame and mechanical pieces.  The stuff is pretty goopy so it leaves this oily effect when it dries.


Here's what I'm going to use to primarily weather this guy.  I used these on my MG Char's Zaku II and I liked using them there.  However, I feel these will work and look better on the smaller 1/144 scale HG's.  Depending on how these turn out on this Gouf I may start just using these for quick HG paint jobs and stick to preshading with an airbrush on my MG's.


I almost forgot.  I decided to give this Gouf a Zaku Machine Gun.  As far as I know, there's no reason why a Gouf or Gouf Custom wouldn't have one.  Anyway, this particular one is from the original HGUC Zaku II and was molded in a weird purple-y grey that Bandai liked to use for a while.  Personally I really don't like the purple-y grey and threw some primer on this thing.  I'll probably try to emulate the RG coloring on this just because.

Well that's all for now.  My goals are to get the whole kit sanded and all my detail painting done.  Then I'll hit it with the Tamiya Weathering Master.  Then I'll hit it with some Alclad Flat Kote to seal the weathering and paint in.  It'll also give the kit a uniform matte-ness that a weathered kit should have.

Til next time...

Tuesday, May 5, 2015

Been pretty busy, but here's a small update

As my wife is finishing up her maternity leave I've been finding myself fairly predisposed of as of late.  Since my kids and work have to take priority my Gunpla hobby has been put on the back burner.  My wife and I also have some new parent friends so time is a precious commodity to me anymore.

That being said, I haven't stopped with Gunpla.  It's just slow going at the moment.  My current project is a HGUC Gouf Custom that I'm trying a few 'new' things on.  I'll probably post a work in progress for it in the next week or so.  I had always thought of myself as a Master Grade guy but I find myself messing with HG's more and more recently and there's a few reasons behind that.  One; They're cheaper, no surprise here. Two; Since I don't have that much time to dedicate to Gunpla currently, it's a lot easier and faster for me to pick up a HG and get to detailing it than to tear apart a MG.  Three; Modern HG's are better than they've ever been.  I remember getting my first Gundam Wing and G Gundam HG's from Wal-Mart back in the day and looking back now, they were atrocious.  The HG's coming out now have better technology and engineering than most early MG's and proportion wise they look great.

Basically my Master Grade work is going to be limited to my backlog for a while.  I just can't afford to drop $50-$70 on a MG.  Especially when I can get a great looking HG for around $20.

Well with that, here's some pics of my work desk and most of my backlog.


As you can see, my desk is currently a wreck.  I basically have this mobile Gunpla work station set up and have been doing the bulk of my work at the kitchen table (easier to watch my daughter that way).  So my desk has sort of become a spare part/junk collector.  If you can make out the MG Char's Zaku and the HGUC Gelgoog in there, those will probably be my next galleries.


Generally how I do kits is snap fit them.  Let them sit like that for a bit.  Then decide what I want to do to them as far as painting and detailing goes.  This also means the bulk of my current collection is unpainted plastic on a shelf.


I'm not a huge Gundam SEED fan (not a straight SEED hater like a lot people either) but I like some of the basic designs like the Strike and the Astrays.  The Astray Blue Frame on this shelf was built by my wife some time ago, and she got me the Red Frame as a little gift not too long ago.  Both are great Master Grades and I'm very anxious to tear into the Red Frame and make it look nice.

Some might be wondering about the Zeta-esque Wave Rider thing on the left.  When we moved into our house a few years ago a couple of my kits took some damage in the move.  2 of which were my MG Zeta Gundam 2.0 and Delta Plus.  Instead of trying to fix the tiny transformation joints I decided to kitbash them.  It's just something I fiddle with now and again.  Not even sure of a final shape or color scheme for it.


In the world of Gundam and Gunpla I can say without a doubt that my favorite mechanical designer is Hajime Katoki.  Whether it's his originals or his redesigns I tend to like everything he does.  In my opinion, Gundam Unicorn is one of his crowning achievements as far as designs go (if you didn't know, Hajime Katoki was the chief mechanical designer for the Unicorn series).  Anyway, it shouldn't be a surprise that my favorite Master Grades are Ver. Ka's.  The Sazabi Ver. Ka in particular.  A suit piloting by my favorite character (Char Aznable) redesigned by Katoki for a monstrous MG release?  That thing was one of the few kits that took over my thoughts until I had it in my hands and in my opinion it didn't disappoint in any way.  I may change up my shelves every now and again but my Katoki shelf here has remained pretty much unchanged since I set it up.


Currently the biggest, most expensive kit in my collection. The Perfect Grade Unicorn Gundam.  This was a Christmas present from my mom.  It's my first PG and honestly it was a bit overwhelming to build the thing.  People basically bitch about how its just a big MG Unicorn.  But on an engineering level I think it is quite a lot better than the MG.  I plan on doing a pre-shade paint job on this guy but for right now it is kind of just sitting.  I want to able to dedicate my full attention and resources on this kit to make it look the best that I can and I just don't have the time right now.  It's depressing, but until my family life calms down a bit this monster of a kit is on a back burner.


I touched on the HG Lightning Gundam Full Burnern's balance issues when I did its gallery.  Alas, it's fallen down again.  This might be a kit that ends up being fix pose because I'm tired of constantly standing the thing back up.  The GM Command there will eventually be detailed and weathered.  The Star Build Strike on the left is complete and just awaiting a gallery.


Jeez the Hyaku Shiki is shiny.  The Kampfer on the right is a semi-custom that's near a completion/gallery point.  The GM Sniper II on the left is the GM Sniper K9 without it's extra accessories.  Eventually I'll get a standard blue GM Sniper II and put the K9 accessories (most of them anyway) on it.  I think the base kit looks great in green anyway.


Ah, my MG Wing Gundam EW.  This was my first airbrushed/pre-shaded Master Grade.  Unfortunately, like my Zeta and Delta Plus, it took some damage while being moved.  I just did the best I could to fix the busted waist, hip, and knee joints.  Since it was painted, I put this guy in it's own box and that box happened to take a heavy tumble.  I used Createx paints on it.  Which, seemed great and easy to use while I was painting.  But, I realized after a few days how brittle the dried paint is (much more so than Tamiya acrylics or Model Master enamels).  Because of the fragile joints and paint job this guy is unfortunately pretty much fix pose.

Well, that's all for now.  I feel bad for not posting any 'actual' content but this will have to do for now.  I should have an actual gallery or my Gouf Custom WIP up within the next week or so.

Til next time.